The Importance Of Setting Up A Home Theater Properly
A proper home theater setup is essential in terms of safety. A poorly designed or installed home theater system can harm you and your loved ones. For example, improperly mounted equipment or speakers can fall and cause injury or damage.
Next, carefully following the instructions is the key to achieving high-quality audio and video output, which is nothing less than a movie theater experience.
But now you don’t have to waste time finding a parking lot in the movie theater or waiting in line to buy tickets.
A proper home theater setup helps you protect yourself and your family from any potential dangers while enjoying movies, TV shows, or whatever you like.
The Benefits Of Using A Projector Instead Of A Television
Whether a projector or a television is the best? This is the primary concern when people have to make their decision. If you are also doubted, let me give you three main points by which a projector will win a television.
Adjustable screen size
Unlike televisions, projectors allow users to customize the screen size to meet their demands.
So you can enjoy your favorite movies, sports events, TV shows, or gaming on a screen size of 100 inches or even more.
Eye comfort
One of the other benefits of projectors is that they create a larger image. So, you can sit further away from the screen, reducing eye strain and fatigue.
Secondly, televisions emit light, while projectors reflect light. It means when using a projector, your eyes see less blue light, which causes eye strain and negatively affects your sleep.
Price
Projectors are often more cost-effective than televisions. For example, you might spend several thousand dollars to buy a high-end 75-inch television, but a projector with a 100-inch screen is more affordable for most of us.
It doesn’t mean all of the projectors are cheap. Yet, with a limited budget, finding a home theater projector with more features is easier than finding a television.
How To Set Up A Home Theater With A Projector?
Setting up a home theater seems to be a daunting task. Hopefully, the following guide can help you successfully have your own home theater.
Step 1: Examine Your Space
If you want to turn your room into a home theater, there are two things you’ll need to check before anything else.
First, you should rearrange your furniture to ensure there is nothing between the projector and the screen. Move your seating or tables away to avoid interfering with the projected image.
The other is about the ambient light in your room. Take a journey around the room and check if there are any light sources. The brighter the room, the less clear your image will be.
If many light sources could potentially impact the viewing quality, you should find another place. Repainting the room with darker colors is also a good idea. Darker colors would maintain the ambient light much better.

Examine your room (Link)
Step 2: Choose The Right Projector And Screen
Choose a projector
Before choosing your projector, you should learn about throw distance. People use the term throw distance to describe how far between the projector and the screen. Within throw distance, you can get an optimal image.
You can easily find information about throw distance on the product website or directly contact the manufacturers.
Another thing you should decide before choosing a projector is where you will place it. Putting your projector on a flat surface or mounting it to the ceiling or a wall would require different kinds of projectors.
The projector definitely should account for the majority of your budget. The projector’s price could change significantly from a hundred dollars to thousands of dollars. People often choose a 1080p projector for around $500 to $1000 for a home theater.
Choose a projector screen
A projector screen can be a flat wall or a white bedsheet. But if you want a fantastic viewing experience, investing in a high-quality projector screen would be a great idea.
Manufacturers design projector screens to improve contrast and image quality, which can overpower ambient light and give you clear and bright images.
You should consider your budget and intended use to choose the right screen. The typical choice would be a white screen of 120” to 150”, which costs you around $50 to $100.

Choose suitable ones for the best experience (Link)
Step 3: Set Up The Projector
Now that you have found the right projector, it’s time to set it up.
You can put the projector on tall shelves or other furniture. It allows accessible installation, quicker adjustments, and stronger input cable connections.
You can also mount your projector to the ceiling or wall. It would be a better choice for those who want to set up the projector permanently. It is unlikely to be hidden by the furniture in the room then able to provide a clear view.
However, mounting the projector to the ceiling or a wall requires more time and effort, and it isn’t easy if you want to move it to another room.
If you would like to mount the projector, find the correct position. You can use a ladder, put the projector on top of it, making adjustments until you find the suitable height.
Remember that changing a ceiling or wall mount projector would be more difficult because it is supposed to be in permanent use. Be careful if you don’t want to waste your time.
Finally, placing your projector directly on the floor is not a good idea as it can easily get bumped into by some careless bypassers.
And don’t forget to think about your seating. The light beam from the projector should reach the screen without any obstructions.

Find a suitable position (Link)
Step 4: Set Up The Screen
Most people prefer to directly mount the screen to a wall or hang it from the ceiling. The ideal choice may be a retractable screen that descends from the top as and when required.
People sometimes put the screen cover on some windows to reduce the ambient light and improve the projected image.
Another choice is using a screen with a fixed frame that can stand independently, particularly for temporary arrangements. Still, it may occupy additional space and easily get bumped or displaced.
The key is to ensure that you have sufficient height to accommodate the screen and fully display projected images.
It doesn’t matter where you place the screen. The main point is that the projector and screen positions should be well-balanced.
Before fixing the positions, make some experiments, alignment, and adjustments to get the best result.
Also, remember to assess your seating position. If your screen is higher than most seats, it can cause discomfort for viewers as we don’t want to strain our necks all the time while enjoying our loved movies.

Set up the screen (Link)
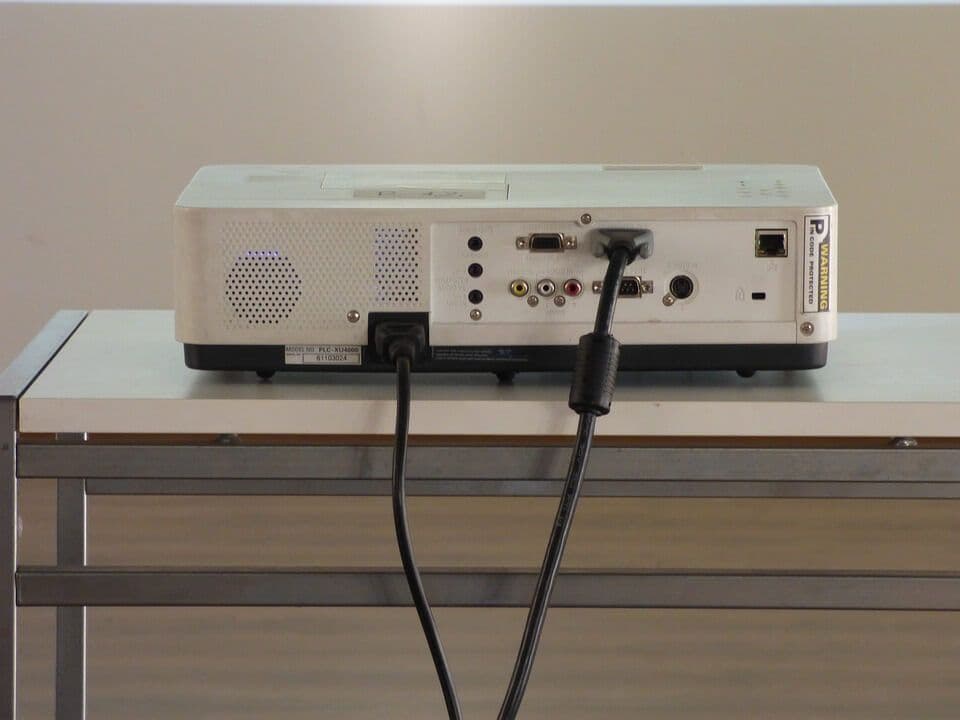
Step 5: Plugin The Cords
Remember to disconnect the power supply from your projector first. You cannot randomly plugin the HDMI cords into the projector.
You should spend some time reading your projector’s manual to understand which wire to the plugin.
Connect one end of the cord to the output port on the input device, like your laptop or DVD player, and the other to the corresponding input port on the projector.
HDMI cables, for example, are often labeled “HDMI Out” on the input device and “HDMI In” on the projector.
Follow the detailed instructions in the projector manual guide. This process may be boring and time-consuming, but believe me, it is worth paying attention to. Any minor mistake could destroy your expensive projector.

Plugin the cords correctly (Link)
Step 6: Adjust The Projected Image
You can achieve the best possible image quality when using a projector by adjusting lens shifts, zoom, and focus.
Align your image with your lens shifts
When you get everything in its position, connect the projector to a power source and access its menu.
As you mount the projector upside down from the ceiling, the projector settings allow you to specify its placement and obtain accurate image orientation.
You can adjust the position of the projected image on the screen by looking for Lens Shift options on the setting or manually aligning the projected image vertically and horizontally until it is on the screen center.
Modern projectors often come equipped with a lens shift feature which you can use to reposition the projected image upwards, downwards, leftwards, or rightwards without moving the projector’s current position.
Adjust your zoom and focus
Now that the projected image centers perfectly on your screen, it’s time to adjust your zoom and focus. These features allow users to adjust the size and clarity of the projected image. You can find your zoom and focus near the lens.
The zoom control changes the size of the projected image by adjusting the distance between the projector lens and the screen. You can either zoom in to make the image larger or zoom out to have a smaller one.
On the other hand, you can use the focus control to adjust the sharpness of the image by fine-tuning the focus of the lens. It helps to make the image clearer and sharper, with better contrast and detail.
Some projectors offer a ratio setting. You can select the 16:9 ratio option in the projector settings or test other models to get the optimal image.

Make adjustments (Link)
Step 7: Set Up Your Audio
High-quality audio output from projectors is not a standard feature, as they are typically not audio devices.
Modern projectors offer users at least an audio option through a 3.5mm headphone jack that you can use to connect to an external speaker.
Using external speakers with projectors requires additional cabling, especially if the projector is ceiling-mounted. Moreover, longer cables could lead to “audio delay” and poorer audio quality.
However, people often connect the projector to a computer or a laptop for audio input. So it is better to connect your speaker to the device directly. This way, you can enjoy high-quality audio and reduce cable length.
You can also connect your projector directly with an external speaker but make sure they are compatible. If you want a cinematic experience, don’t hesitate to invest in a soundbar or a surround sound system.
However, before deciding between a soundbar and a surround sound system, think about your room size, desired audio quality, and budget.
You can upgrade your home theater with a surround sound system as long as you have enough budget and space. This system would give a fantastic audio experience, like in a movie theater.
With a small room and a limited budget, a soundbar would be a compromise. You can improve the sound quality while it costs you less than a surround system.

Try a soundbar or a surround sound system (Link)
Step 8: Manage All Your Cables
After setting up the projector, you now have to handle some cable work. Be mindful of cable routing and length when setting up your devices so that cables can be kept hidden while still being able to connect to their respective devices.
If you put your projector on a table or a shelf, you may hide the cables right under the table or the shelf. For a ceiling or wall mount projector, you should run your cables through the walls or ceiling to ensure aesthetic quality.
Now you have finished your setup process. It’s time to enjoy a movie or TV show with your family.

Enjoy your movie (Link)
FAQs
How Can I Make My Home Theater Projector?
By following the above guide, you can set up your own projector-based home theater, which could imitate the cinema experience.
However, it requires some technical knowledge and specialized equipment. If you're not good at electronics, think about hiring a professional to install your home theater system.
How Far Should A Home Theater Projector Be From The Screen?
The distance between the home theater projector and the screen is the throw distance. When choosing a projector, you can find information about throw distance on the Internet or directly contact manufacturers.
Then tell them the size of your room, you will gain some useful advice about how to choose the projector and the distance between the projector and the screen.
Can I Use My Projector As A Television?
The answer is yes. But the main point is that you must buy additional equipment, such as an external speaker and a high-quality screen.
However, using a projector to watch your loved movies or TV shows could give you higher satisfaction. It is worth an investment.
Final Verdict
Setting up a projector-based home theater might be relatively expensive and time-consuming, but this is a payoff. You can follow the above process and learn how to set up a home theater with a projector.
Generally, the setup process includes choosing the right place, project, and screen, putting everything in the correct position, and making some adjustments to have the best sound and image quality.
With your own home theater, you can watch what you want whenever you want without leaving your house. Also, it can be a great way to bring the family together and create lasting memories.